How to Set Up a Router at Home: Simple Setup, Reset, and Placement Guide
By HomeNetCompass Editorial | Updated May 2026 | 8 min read
Router setup is simple when you follow the right order. Use this guide when setting up a new router, replacing an old router, fixing a setup mistake, or resetting a router safely.
You connect the router to your modem, power the devices in the right sequence, create a Wi-Fi name and password, secure the router settings, place the router properly, and test the connection.Do not start by changing advanced settings. Most home users only need the basic setup, correct placement, and secure defaults.
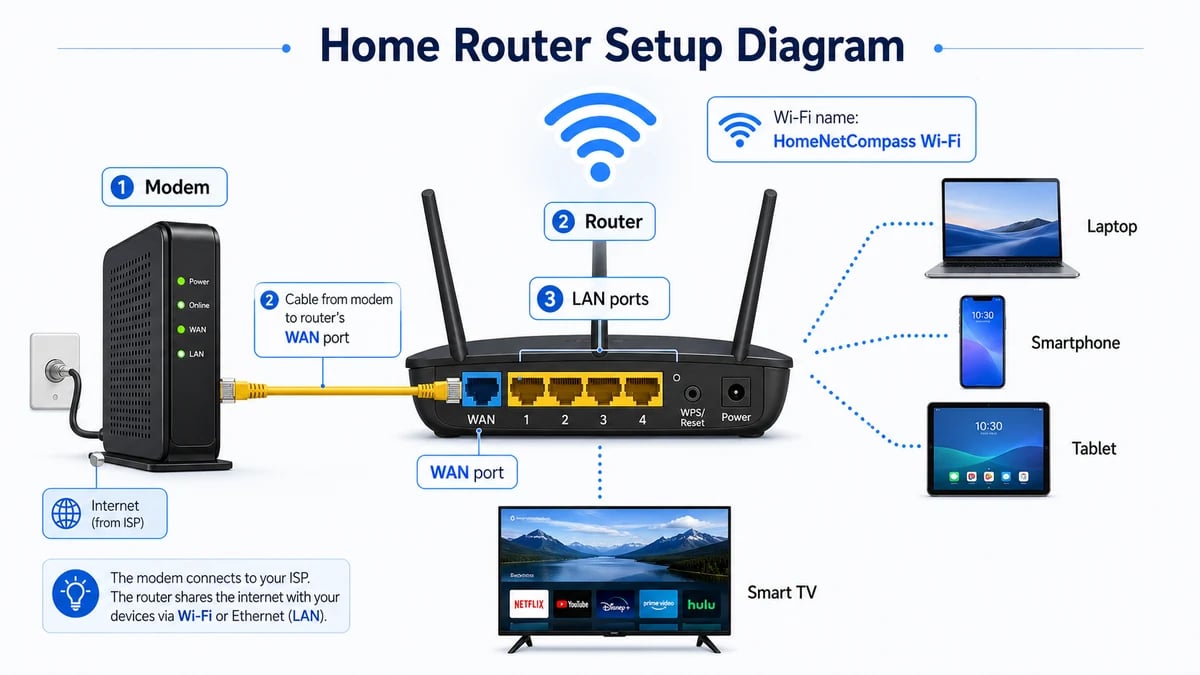
Quick answer
To set up a router at home, follow this order:
Connect the modem to the router’s WAN or internet port.
Power on the modem first.
Power on the router second.
Connect to the router’s default Wi-Fi.
Open the router app or web setup page.
Create a Wi-Fi name and password.
Change the router admin password.
Use WPA3 or WPA2 security.
Update the router firmware.
Test the internet connection.
NETGEAR’s setup guidance follows the same basic flow: connect the router to the modem, power on the router, join the default Wi-Fi network, then complete setup in the app or web page. Netgear Knowledge Base
What you need before router setup
Get these ready first:
Router
Modem or ISP gateway
Ethernet cable
Router power adapter
Modem power adapter
Phone, tablet, laptop, or desktop
Router app if your model uses one
ISP login details if your provider requires PPPoE or another manual connection type
Router label or setup card with default Wi-Fi details
Active internet service
Access to your router label, setup card, or app login
If your internet provider gave you one combined modem-router box, it may be called a gateway. You may not need a separate modem. Most modern routers support setup through a mobile app or web browser.
Router setup terms you should know
Modem
A modem connects your home to your internet provider.
It usually connects to cable, fiber, DSL, or another provider line.
Router
A router creates your home network.
It lets phones, laptops, TVs, consoles, and smart devices share the internet through Wi-Fi or Ethernet.
Gateway
A gateway combines a modem and router in one device.
Many ISP-provided boxes are gateways.
WAN port
The WAN port is the router port that connects to the modem.
It may be labeled:
WAN
Internet
Globe icon
NETGEAR’s router setup guidance says to connect the internet port on the router to the modem or incoming Ethernet line. Netgear Knowledge Base
LAN port
LAN ports connect wired devices to the router.
Use LAN ports for:
Desktop computer
Smart TV
Gaming console
Streaming device
Network switch
SSID
SSID means Wi-Fi network name.
This is the name you see when choosing a Wi-Fi network on your phone or laptop.
Wi-Fi password
The Wi-Fi password lets devices connect to your wireless network.
The Wi-Fi password and SSID are different from the router admin password.
Router admin password
The router admin password lets you log in and change router settings.
Do not make it the same as your Wi-Fi password.
CISA recommends changing default router usernames and passwords because default credentials are not secure and can be publicly available. CISA
Router setup page
The router setup page is where you change Wi-Fi names, passwords, security settings, and firmware settings. Some routers use a mobile app instead of a browser setup page. Do not change advanced settings such as bridge mode, DNS, VLAN, port forwarding, or PPPoE unless your router app, ISP, or manual tells you to. Most home router setup does not require those settings.
How to set up your router step by step
Step 1: Turn off your modem and router
If your modem and router are already powered on, turn them off first.
This gives the setup a clean start. If you are replacing an old router, take a photo of the old cable layout before unplugging anything.
Step 2: Connect the modem to the router
Plug one end of the Ethernet cable into the modem.
Plug the other end into the router’s WAN or internet port.
Do not plug the modem cable into a LAN port unless your router manual specifically says so. The modem cable should usually go into the WAN, internet, or globe-icon port. Do not use a numbered LAN port unless your manual says so.
Step 3: Power on the modem first
Plug in the modem.
Wait for its connection lights to become stable.
This can take a few minutes.
Step 4: Power on the router
Plug in the router.
Wait until the router finishes starting. Do not press the reset button during startup. Wait until the router finishes booting.
Many routers use a light pattern to show when they are ready for setup. The exact light color and behavior depends on the model, so check the router label, app, or manual.
Step 5: Connect to the router’s default Wi-Fi
Look for the default Wi-Fi name and password on the router label, setup card, or packaging.
Connect your phone or laptop to that network. The default Wi-Fi name may be called SSID on the label.
Step 6: Open the router app or setup page
Use the setup method your router supports.
Common options include:
Router mobile app
Web setup address
Router IP address
QR code setup
If the setup page does not open, connect your laptop to a LAN port with Ethernet and try again.
Step 7: Create your Wi-Fi name and password
Create a Wi-Fi name that is simple but not too personal.
Good Wi-Fi name examples:
HomeNet
UpstairsWiFi
FamilyWiFi
ApartmentWiFi
Avoid using:
Your full name
Your exact address
Your phone number
Your apartment number
Sensitive personal information
After changing the Wi-Fi name or password, devices using the old Wi-Fi details will disconnect.
Step 8: Change the router admin password
This is not the same as the Wi-Fi password.
Use a strong, unique password for the router admin login. Save the admin password somewhere safe. Losing it may require a factory reset.
Step 9: Choose WPA3 or WPA2 security
Use WPA3 Personal if your router and devices support it.
Use WPA2 Personal if WPA3 causes compatibility issues with older devices.
The FTC says WPA3 Personal is newer and best, while WPA2 Personal still protects wireless traffic. CISA also recommends WPA3 Personal or WPA2 AES for home Wi-Fi.
Avoid WEP and old WPA if those are the only options.
Step 10: Update router firmware
Check for firmware updates in the router app or web dashboard.
Firmware updates can improve security and stability. Do not unplug the router during a firmware update.
TP-Link warns users to download firmware only from the official TP-Link website for the correct hardware version and region. It also warns not to turn off the router or disconnect Ethernet during a firmware update. TP-Link
Step 11: Reconnect your devices
After changing the Wi-Fi name or password, your devices may disconnect.
Reconnect each device using the new Wi-Fi password. Start with one phone or laptop before reconnecting every device. Confirm the new Wi-Fi works first.
NETGEAR notes that after changing the Wi-Fi name or password, disconnected devices need to reconnect using the new network key.
Step 12: Test the connection
Test the internet on:
Phone
Laptop
Smart TV
One device near the router
One device in another room
Open a few websites, play a short video, and run a speed test if needed. Test one device near the router and one device in the farthest normal-use room.
If the router works near the router but fails in another room, you likely have a placement or coverage problem read our guide on how to fix Wi-Fi dead zones. If your speed test looks slow after setup, compare your issue with our guide on why your Wi-Fi is slow before changing more router settings.


Router setup checklist
How to place your router for better Wi-Fi
Router placement affects Wi-Fi coverage.
Place your router:
Near the center of your home
Off the floor
In plain view
On a shelf, table, or TV stand
Away from thick walls
Away from metal objects
Away from large appliances
Away from microwaves
Away from cabinets
Google recommends placing Wi-Fi routers off the ground, in plain view, and near the center of the home at eye level when possible. Google Help
Avoid placing your router:
Inside a cabinet
Behind a TV
Under a desk
In a corner
In a basement
On the floor
Next to large metal furniture
Google also notes that Wi-Fi points work better when they avoid physical obstructions like walls, doors, and aquariums.
If you use mesh Wi-Fi, check node placement
Do not place a mesh node directly inside the weak room if the signal is already poor there. Place it between the main router and the weak area, where it can still receive a strong signal. For larger homes, spread mesh points evenly and avoid placing them too close together. After moving the router, test Wi-Fi near the router and in the farthest room you normally use.
How to secure your router after setup
Do these settings after your internet works.
Change the default admin login
Default router credentials are not safe.
CISA warns that default administrator passwords can be available online or printed on the device, which creates opportunities for unauthorized access.
Use a strong Wi-Fi password
Do not use:
12345678
password
your name
your phone number
your address
your birthday
Use a longer password that is hard to guess.
Use WPA3 or WPA2
Use WPA3 Personal when possible.
Use WPA2 Personal if WPA3 creates problems with older devices.
Turn off remote management if you do not need it
Remote management lets you access router settings from outside your home.
Most regular users do not need it. Only leave it on if you know why you need it.
The FTC recommends turning off remote management, WPS, and UPnP because these features can weaken security.
Disable WPS if you do not use it
WPS lets devices join the network more easily, but it can create security risk.
CISA recommends disabling WPS setup.
Create a guest network
Use a guest network for visitors and smart devices when your router supports it.
CISA recommends creating a guest Wi-Fi network.
Enable automatic firmware updates if available
Some routers can install security updates automatically. Turn this on if your router supports it and you trust the update process.
Reboot vs reset: do not confuse them
Rebooting and resetting are different.
Reboot
A reboot restarts the router.
It does not erase your Wi-Fi name, password, or settings.
Use reboot when:
Wi-Fi feels slow
Devices stop connecting
Internet stops working
Router feels stuck
You want a clean restart
Linksys explains that rebooting turns the router off and on again, while connected devices briefly disconnect and should reconnect afterward. Linksys.
Reset
A reset restores factory settings.
It erases custom settings.
Use reset only when:
You forgot the admin password
You are giving the router to someone else
Setup is broken and normal fixes failed
The manufacturer or ISP tells you to reset
You want to start from scratch
Linksys says factory reset erases customized settings such as network name and wireless security, and the router needs to be reconfigured afterward. TP-Link gives the same warning that a hard reset restores factory defaults and requires reconfiguration from scratch unless you have a backup.
How to reset your router safely
Do not reset first. Reboot first.
If you must reset, follow this process.
Step 1: Write down your settings
Save:
Wi-Fi name
Wi-Fi password
Admin login
ISP connection type if known
Any custom settings
Guest network settings
Do not factory reset during a firmware update. Wait until the router is fully restarted and stable.
Step 2: Find the reset button
Most routers have a small reset button.
It may sit on the back or bottom of the router.
Step 3: Hold the reset button
The exact time depends on the model.
TP-Link says many TP-Link routers require holding the WPS or RESET button for more than 10 seconds until the system LED changes from slow flash to quick flash. Linksys says some models require holding the reset button for 10 to 20 seconds. TP-Link
Step 4: Wait for the router to restart
Do not unplug it during reset.
Wait for the router lights to stabilize.
Step 5: Set it up again
After reset, connect using the default Wi-Fi details on the router label or setup card.
Then repeat the setup process:
Connect router to modem.
Join default Wi-Fi.
Open setup app or web page.
Create Wi-Fi name and password.
Change admin password.
Use WPA3 or WPA2.
Update firmware.
Test internet.
What to do if router setup does not work
Problem: No internet after setup
Check:
Ethernet cable is plugged into the modem and router WAN port
Modem is powered on
Router is powered on
Modem lights are stable
Router app shows internet connection
ISP service is active
If your modem is new or recently replaced, your ISP may need to activate it. NETGEAR’s modem and router setup guidance notes that if a modem has never been activated, users may need to contact the ISP. NETGEAR’s
Problem: You cannot find the Wi-Fi network
Check:
Router is fully powered on
Wi-Fi is enabled
You are close to the router
You are using the correct default Wi-Fi name
Router is not still rebooting
Problem: Password does not work
Check:
You are entering the Wi-Fi password, not the admin password
Uppercase and lowercase letters
Similar characters such as O and 0
Router label or setup card
Problem: Setup page does not open
Try:
Reconnect to the router Wi-Fi
Use Ethernet from laptop to LAN port
Restart the router
Try the router app
Try the web address or IP listed on the router label
Check the manual
Problem: Wi-Fi works near the router but not far away
This is a coverage issue, not necessarily a setup failure.
Fix:
Move the router to a central location
Raise it off the floor
Remove nearby blockers
Avoid cabinets and corners
Consider mesh Wi-Fi, extender, or Ethernet if the home layout blocks signal
If your Wi-Fi works near the router but fails in one room or upstairs, read our guide on how to fix Wi-Fi dead zones.
Problem: Only one device cannot connect
If only one phone, laptop, or TV cannot connect, the router may be working fine. Restart that device, forget the Wi-Fi network, reconnect with the correct password, and test another device before changing router settings.
Problem: Setup page says connected but there is no internet
Checks:
Modem is activated.
Ethernet cable is in WAN or internet port.
ISP service is active.
Router app shows internet connection.
Modem lights are stable.
Final checklist
Connect
Connect modem to router WAN port
Power modem first.
Power router second.
Connect to default Wi-Fi.
Configure
Open app or setup page.
Create Wi-Fi name and password.
Change router admin password.
Use WPA3 or WPA2.
Update firmware.
Test and maintain
Place router centrally.
Test Wi-Fi near and far.
Reboot for temporary issues.
Reset only when you need to erase settings.
If you have other router setup problems or issues, check out our router setup guides.
FAQ
How long does router setup take?
Most home router setup takes 10 to 20 minutes if the modem is active, the Ethernet cable is connected correctly, and the router app or setup page works normally.
Do I connect my router to the modem?
Yes. Connect the modem to the router’s WAN or internet port with an Ethernet cable. NETGEAR’s setup guide uses this connection method for router setup.
Can I set up a router without an app?
Yes. Many routers can be set up through a web browser by using the setup address or router IP address listed on the router label or manual.
Why does my router say connected but there is no internet?
The router may be broadcasting Wi-Fi without receiving internet from the modem. Check the WAN cable, modem lights, ISP activation, and router internet status.
What is the best place to put a router?
Place it near the center of your home, off the floor, in plain view, and away from objects that block signal. Google recommends central, elevated, open placement when possible.
Is the Wi-Fi password the same as the router admin password?
No. The Wi-Fi password connects devices to the network. The admin password lets you change router settings. NETGEAR explains that these are different.
Should I reboot or reset my router?
Reboot first. Rebooting restarts the router without erasing settings. Resetting restores factory defaults and erases custom settings. Linksys explains this distinction clearly.
Does resetting a router erase the Wi-Fi name and password?
Yes. A factory reset erases custom settings such as network name and wireless security. You must set up the router again afterward.
Should I use WPA2 or WPA3?
Use WPA3 Personal if your router and devices support it. Use WPA2 Personal if WPA3 causes compatibility problems. The FTC says WPA3 is newer and best, while WPA2 Personal also protects wireless traffic.
Should I disable WPS?
Yes, unless you specifically need it. CISA recommends disabling WPS setup as part of home Wi-Fi security.
Found an error or missing step in this router setup guide? Contact us and tell us what needs to be corrected.